In the previous issue of "Teach you to fancy lighting," we have taught everyone how to put a lamp to the extreme. And the lighting is not finished yet. This time, I will give you some advanced courses to teach you how to light up a row of lights. Get on the train quickly, the old driver is ready to take off!
After the simplest experiment of an LED, it is natural to add a few LEDs and arrange them in a row. Finally, put a row of LEDs into an 8 word to play - seven-segment digital tube.
Water lamp one - marquee
The first appearance is definitely a classic running light, also called a marquee.
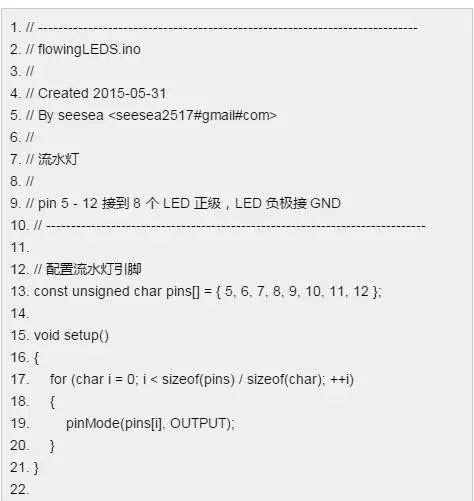

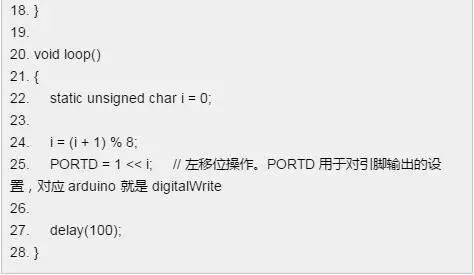
Water lamp II - overall operation of the port
Try the water light again, here is a whole port operation, feel more concise?

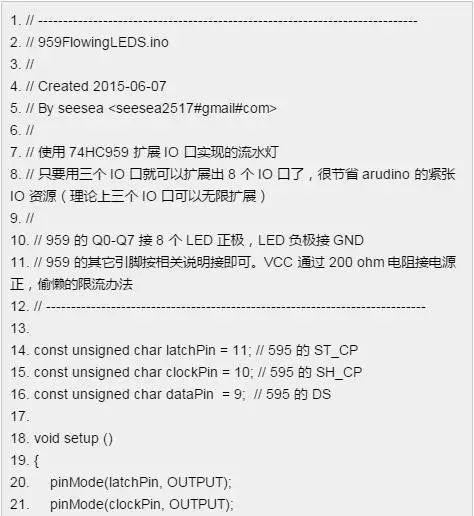
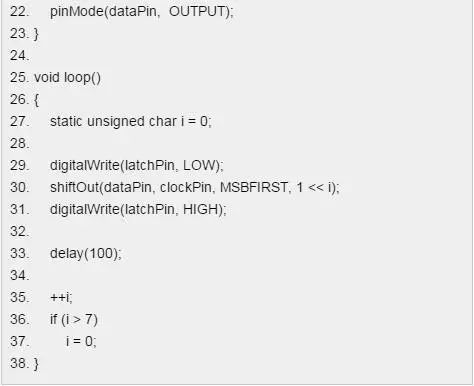
Water light three - 74HC959 extended IO port
It is a running light! This time use the 74HC595 to expand the IO port. For arduino, the IO port resources are very tight. Sooner or later, when it is not enough, you need to expand. Using the 74HC595 is a relatively common solution.
Raindrop trailing effect water light
Sorry, it is still a running light. This simulation is a bit more realistic, plus the trailing effect of the water droplets.
The first is a simple method, using the six pwm ports of uno.
1. // ---------------------------------------------- ------------------------------
2. // raindropLEDS.ino
3. //
4. // Created 2015-06-04
5. // By seesea
6. //
7. // Raindrop flow effect
8. // The difference between the raindrop flow effect and the running water light (the marquee) is that the raindrop flow effect has a trailing effect, that is, the lit light is slowly extinguished.
9. //
10. // Use UNO's six PWM pins to achieve raindrop flow
11. // UNO's six PWM pins are pin 3 5 6 9 10 11, these legs are connected to 6 LED positive terminals, and the LED negative terminals are connected to GND.
12. //
13. // ---------------------------------------------- ------------------------------
14.
15. const unsigned char pins[] = { 3, 5, 6, 9, 10, 11 }; // six pwm pins
16. const unsigned char initPwm = 240; // the pwm value of the brightest light, ie the brightness of the first light when moving
17. const unsigned char deltaPwm = 10; // The pwm value at which the light is slowly extinguished. How dark is the latter light than the previous one? This is equivalent to an equidistance queue. The brightness of the difference is not very good, so the next equal factor is introduced.
18. const unsigned char deltaPercent = 30; // The latter light is darker than the previous one and its brightness is a few percent of the previous one. Relative to the previous decrement, this is equivalent to the proportional series
19. const unsigned long delayMs = 100; // move delay, in ms
20. const unsigned char pinNum = sizeof(pins) / sizeof(pins[0]); // number of pins, ie number of LEDs
twenty one.
22. unsigned char ledPwm[pinNum]; // store the brightness PWM value of each LED at runtime
twenty three.
24. void setup()
25. {
26. for (char i = 0; i < pinNum; ++i)
27. {
28. pinMode(pins[i], OUTPUT);
29. ledPwm[i] = 0;
30. }
31.
32.
33. void loop()
34. {
35. static unsigned char head = 0;
36.
37. // Every time you enter the loop() function, all the brightness of the lamp is processed.
38. for (unsigned char i = 0; i < pinNum; ++i)
39. {
40. ledPwm[i] = ledPwm[i] * deltaPercent / 100;
41. if (ledPwm[i] <= deltaPwm)
42. ledPwm[i] = 0;
43. else
44. ledPwm[i] -= deltaPwm;
45.
46. ​​if (i == head)
47. ledPwm[i] = initPwm;
48.
49. analogWrite(pins[i], ledPwm[i]);
50.
51.
52. // Move the drop head
53. head = (head + 1) % pinNum;
54.
55. // Delay
56. delay(delayMs);
57. }
Raindrop trailing effect water light II - digital IO port simulation
There are only 6 PWM ports in front of it. It's not enough. We use all the IO ports, including the analog port. It can also be used as a digital IO port.
1. // ---------------------------------------------- ------------------------------
2. // digitalRaindropLEDS.ino
3. //
4. // Created 2015-06-04
5. // By seesea
6. //
7. // Raindrop flow effect achieved by digital pins
8. // The difference between the raindrop flow effect and the running water light (the marquee) is that the raindrop flow effect has a trailing effect, that is, the lit light is slowly extinguished.
9. //
10. // Use the analog PWM to achieve the effect of raindrop flow on all pins of UNO, including analog input port can also be used as digital output
11. // Each pin is connected to the LED positive terminal, and the LED negative terminal is connected to GND.
12. // ---------------------------------------------- ------------------------------
13.
14. const unsigned char leds[] = { A5, A4, A3, A2, A1, A0, 0, 1, 2, 3, 4, 5, 6, 7, 8, 9, 10, 11, 12, 13 } ; // All pins are arranged in the order of LEDs
15. const unsigned int maxPwm = 100; // Manually simulate PWM, you can define the maximum PWM value by yourself, so it is convenient to define a whole hundred thousand.
16. const unsigned int initPwm = 100; // the pwm value of the brightest light, ie the brightness of the first light when moving
17. const unsigned int deltaPwm = 1; // The pwm value at which the light is slowly extinguished. How dark is the latter light than the previous one? This is equivalent to an equidistance queue. The brightness of the difference is not very good, so the next equal factor is introduced.
18. const unsigned int deltaPercent = 70; // The next lamp is darker than the previous one and its brightness is a few percent of the previous one. Relative to the previous decrement, this is equivalent to the proportional series
19. const unsigned long delayMs = 70; // move delay, in ms
20. const unsigned char ledNum = sizeof(leds) / sizeof(leds[0]); // number of pins, ie number of LEDs
twenty one.
22. unsigned int ledPwm[ledNum]; // Store the brightness PWM value of each LED at runtime
twenty three.
24. void setup()
25. {
26. for (char i = 0; i < ledNum; ++i)
27. {
28. pinMode(leds[i], OUTPUT);
29. ledPwm[i] = 0;
30. }
31.
32.
33. extern volatile unsigned long timer0_millis; // Declare the external variable timer0_millis for use in the program, which is actually the return value of millis() - the number of milliseconds the program runs
34. void loop()
35. {
36. static unsigned char head = 0;
37. static unsigned long lastTick = timer0_millis;
38. unsigned int i, j;
39.
40. // Light up first, turn off the light when the duty cycle reaches the switching point
41. for (i = 0; i < ledNum; ++i)
42. {
43. if (ledPwm[i] == 0)
44. continue;
45.
46. ​​digitalWrite(leds[i], HIGH);
47. }
48.
49. // The drop head is the brightest
50. ledPwm[head] = initPwm;
51.
52. // Here is the digital port analog PWM program.
53. for (i = 0; i < maxPwm; ++i)
54. {
55. for (j = 0; j < ledNum; ++j)
56. {
57. if (i == ledPwm[j])
58. digitalWrite(leds[j], LOW);
59.
60.
61. delayMicroseconds(1);
62.
63.
64. // If the delay time has not yet arrived, jump out first without moving the water droplets
65. // Since the PWM is simulated with a digital port, the program must run continuously. You cannot use delay() to delay, it will get stuck.
66. if (timer0_millis - lastTick < delayMs)
67. return;
68.
69. lastTick = timer0_millis;
70.
71. // Handle the brightness of each lamp
72. for (i = 0; i < ledNum; ++i)
73. {
74. ledPwm[i] = ledPwm[i] * deltaPercent / 100;
75. if (ledPwm[i] <= deltaPwm)
76. ledPwm[i] = 0;
77. else
78. ledPwm[i] -= deltaPwm;
79.
80. if (i == head)
81. ledPwm[i] = initPwm;
82. }
83.
84. // Move the drop head
85. head = (head + 1) % ledNum;
86.

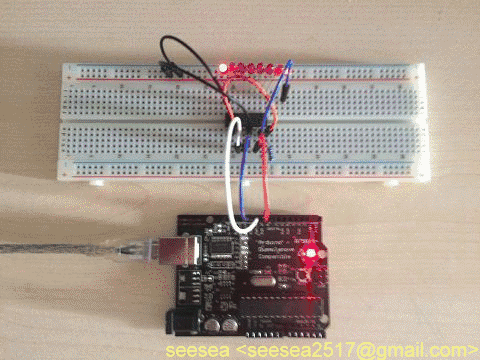
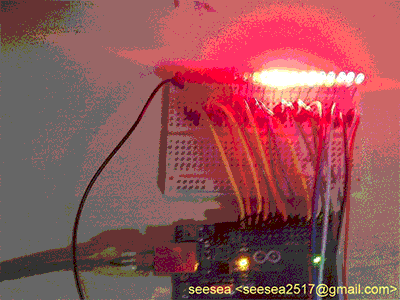
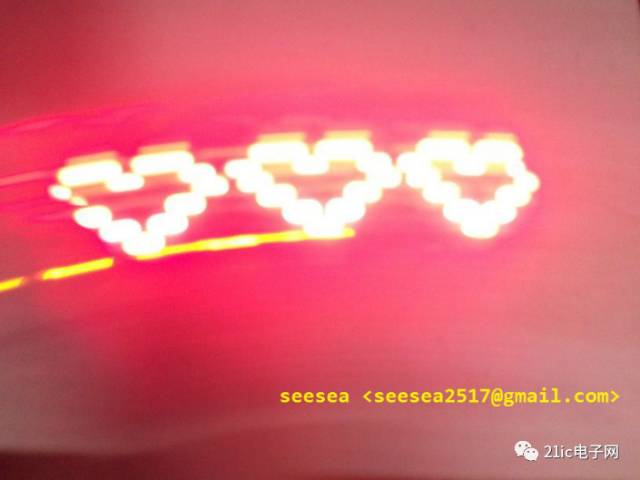
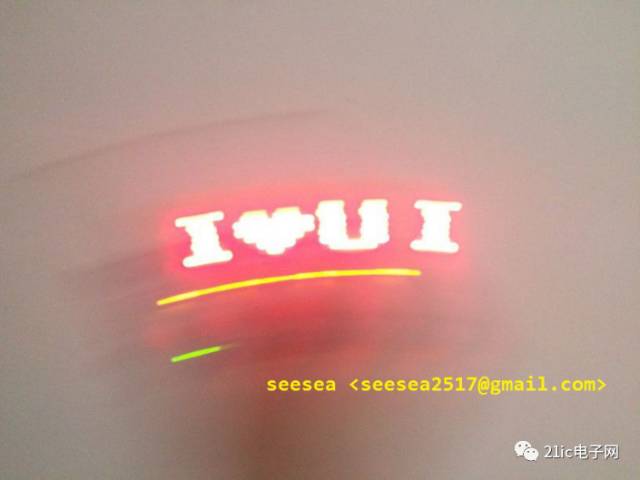
It’s time for the POV shaker to dance and shake it up.
1. // ---------------------------------------------- ------------------------------
2. // povLEDS.ino
3. //
4. // Created 2015-05-31
5. // By seesea
6. //
7. // Shake the stick
8. //
9. // pin 0 - 7 is connected to the LED positive pole, and the LED negative pole is connected to GND
10. // pin 8 connects the mercury switch to one foot, and the other side of the mercury switch is connected to GND
11. // The mercury switch is placed horizontally in the direction of the rocking. If the actual effect is opposite to the expected effect level, just swap the wiring of the two switches of the mercury switch.
12. // Note: Since pin 0 1 is grounded through the LED, it needs to be disconnected to download successfully.
13. // ---------------------------------------------- ------------------------------
14.
15. const unsigned char key = 8; // mercury switch
16. const unsigned char delayTimeMs = 2; // LED lighting delay during scanning
17.
18. // The modulo software uses the vertical 8 points to take the modulo
19. unsigned char col[] =
20. {
21. // Heart
22. // 0x30, 0x48, 0x44, 0x22, 0x44, 0x48, 0x30, 0x00
twenty three.
24. // I heart U
25. 0x82, 0xFE, 0xFE, 0x82, 0x00, 0x30, 0x78, 0x7C,
26. 0x3E, 0x7C, 0x78, 0x30, 0x00, 0xFC, 0xFE, 0x02,
27. 0x02, 0xFE, 0xFC, 0x00, 0x00, 0x00
28.
29. /* 1 2 3
30. 0x00, 0x42, 0xFE, 0x02, 0x00, 0x00, 0x00, 0x00,
31. 0x46, 0x8A, 0x92, 0x92, 0x62, 0x00, 0x00, 0x00,
32. 0x84, 0x82, 0x92, 0xB2, 0xCC, 0x00
33. */
34. };
35.
36. unsigned char cols = (sizeof(col) / sizeof(col[0]));
37.
38. void setup()
39. {
40. DDRD = 0xFF;
41. pinMode(key, INPUT_PULLUP);
42. }
43.
44. void loop()
45. {
46. ​​char i = 0;
47. char keyValue = digitalRead(key);
48. char delta = 1;
49.
50. if (keyValue == 1) // When the direction is from right to left
51. {
52. // Here are two options
53. // One is to turn off all lights when sweeping to the left
54. // The other is to illuminate the columns in reverse, so that the display changes back because the direction is also reversed.
55. // Change the if condition to 0 or 1 as needed. You can choose a different solution.
56. // The advantage of the first option is that it is not easy to have ghosting, but the disadvantage is low brightness.
57. // The difference between the advantages and disadvantages of the second option is just the opposite
58. if (0)
59. {
60. // Shake all lights off to the left
61. i = 0;
62. PORTD = 0x00;
63.
64. // If you choose this option, you don't need to continue the scan below, you can return it.
65.
66. }
67. else
68. {
69. delta = -delta;
70.
71. }
72.
73. if (delta == 1)
74. {
75. //When shaking to the right
76. for (i = 0; i < cols; ++i)
77. {
78. PORTD = col[i];
79. delay(delayTimeMs);
80.
81. }
82. else
83. {
84. //When shaking to the left
85. for(i = cols - 1; i >= 0; --i)
86. {
87. PORTD = col[i];
88. delay(delayTimeMs);
89.
90.
91.
Wiring diagram I think I have to look at it, the effect map, pick a nice look from hundreds of photos:

Static digital tube display
The total station is boring in a row, it is time to change the line. Now arrange it in 8 words. Light up an 8 word first, using the static display method.
1. // ---------------------------------------------- ------------------------------
2. // static7segLEDS.ino
3. //
4. // Created 2015-06-06
5. // By seesea
6. //
7. // Static seven-segment digital tube
8. // Static display of seven-segment digital tube using PORTD, loop display 0 - F
9. //
10. // Here is the 7-segment digital tube of Gongyang. If you use the common yin, you can reverse the segment code table.
11. // The order of the digital segments is arranged as follows
12. //
13. // A
14. // ---
15. // F| G |B
16. // ---
17. // E| D | C
18. // --- . DP
19. //
20. // Then, according to the number that needs to be displayed, the segment will light up output 1, and the segment code table can be created. This way is made in the common shade, so when used, the inverse is the segment code of the common yang.
21. // +---+--+--+--+--+--+--+--+--+-----+
22. // | | A| B| C| D| E| F| G|DP| Segment Code |
23. // +---+--+--+--+--+--+--+--+--+-----+
24. // | 0 | 1| 1| 1| 1| 1| 1| 1| 0| 0| 0xFC|
25. // +---+--+--+--+--+--+--+--+--+-----+
26. // | 1 | 0| 1| 1| 0| 0| 0| 0| 0| 0| 0x60|
27. // +---+--+--+--+--+--+--+--+--+-----+
28. // | 2 | 1| 1| 0| 1| 1| 0| 1| 0| 0xDA|
29. // +---+--+--+--+--+--+--+--+--+-----+
30. // | 3 | 1| 1| 1| 1| 0| 0| 1| 0| 0|Fx|
31. // +---+--+--+--+--+--+--+--+--+-----+
32. // | 4 | 0| 1| 1| 0| 0| 1| 1| 0| 0x66|
33. // +---+--+--+--+--+--+--+--+--+-----+
34. // | 5 | 1| 0| 1| 1| 0| 1| 1| 0| 0xB6|
35. // +---+--+--+--+--+--+--+--+--+-----+
36. // | 6 | 1| 0| 1| 1| 1| 1| 1| 0| 0|BE|
37. // +---+--+--+--+--+--+--+--+--+-----+
38. // | 7 | 1| 1| 1| 0| 0| 0| 0| 0| 0| 0xE0|
39. // +---+--+--+--+--+--+--+--+--+-----+
40. // | 8 | 1| 1| 1| 1| 1| 1| 1| 1| 0| 0xFE|
41. // +---+--+--+--+--+--+--+--+--+-----+
42. // | 9 | 1| 1| 1| 1| 0| 1| 1| 0| 0|Fx|
43. // +---+--+--+--+--+--+--+--+--+-----+
44. // | A | 1| 1| 1| 0| 1| 1| 1| 0| 0xEE|
45. // +---+--+--+--+--+--+--+--+--+-----+
46. ​​// | B | 0| 0| 1| 1| 1| 1| 1| 1| 0| 0x3E|
47. // +---+--+--+--+--+--+--+--+--+-----+
48. // | C | 0| 0| 0| 1| 1| 0| 1| 0| 0|1x|
49. // +---+--+--+--+--+--+--+--+--+-----+
50. // | D | 0| 1| 1| 1| 1| 0| 1| 0| 0|7x7A|
51. // +---+--+--+--+--+--+--+--+--+-----+
52. // | E | 1| 0| 0| 1| 1| 1| 1| 1| 0| 0x9E|
53. // +---+--+--+--+--+--+--+--+--+-----+
54. // | F | 1| 0| 0| 0| 1| 1| 1| 0| 0|8x8E|
55. // +---+--+--+--+--+--+--+--+--+-----+
56. // ---------------------------------------------- ------------------------------
57.
58. // Common section code table 0 - F
59. const unsigned char segTable[] = {
60. ~0xFC, ~0x60, ~0xDA, ~0xF2, ~0x66, ~0xB6,
61. ~0xBE, ~0xE0, ~0xFE, ~0xF6, ~0xEE, ~0x3E,
62. ~0x1A, ~0x7A, ~0x9E, ~0x8E
63. };
64.
65. void setup()
66. {
67. DDRD = 0xFF; // PORTD is set to output
68. }
69.
70. void loop()
71. {
72. for (char i = 0; i < sizeof(segTable) / sizeof(segTable[0]); ++i)
73. {
74. PORTD = segTable[i];
75. delay(500);
76. }
77. }

Dynamic digital tube display
The above is a display of a digital tube, you can use static, if you want to display multiple bits, then you can move.
1. // ---------------------------------------------- ------------------------------
2. // dynamic7segLEDS.ino
3. //
4. // Created 2015-06-06
5. // By seesea
6. //
7. // Dynamic seven-segment digital tube
8. // Dynamic display of seven-segment digital tube, counting from 0000, back to 099 after 9999
9. //
10. // Use PORTD for segment selection, use pin 8 9 10 11 for bit selection
11. // ---------------------------------------------- ------------------------------
12.
13. #define COM_ON HIGH // Common terminal level enabled by the common digital tube
14. #define COM_OFF LOW // Common terminal level disabled by the common digital tube
15.
16. // Common section code table 0 - F
17. const unsigned char segTable[] = {
18. ~0xFC, ~0x60, ~0xDA, ~0xF2, ~0x66, ~0xB6,
19. ~0xBE, ~0xE0, ~0xFE, ~0xF6, ~0xEE, ~0x3E,
20. ~0x1A, ~0x7A, ~0x9E, ~0x8E
twenty one. };
twenty two.
23. const unsigned char pinPos[] = { 8, 9, 10, 11 }; // bit select pins, arranged from low to high
24. const unsigned int initNum = 0; // count initial value
25. const unsigned int maxNum = 9999; // maximum count
26. const unsigned char com_num = sizeof(pinPos) / sizeof(pinPos[0]); // number of commons used to determine how many bits
27. const unsigned long delayMs = 50; // dynamic scan delay time
28.
29. void setup()
30. {
31. DDRD = 0xFF; // PORTD is set to output
32. for (char i = 0; i < sizeof(pinPos) / sizeof(pinPos[0]); ++i)
33. {
34. pinMode(pinPos[i], OUTPUT);
35.
36. }
37.
38. // Display the number num on the seven-segment digital tube
39. // Separate the digits of each of the ten digits of the num number and display them on each digital tube.
40. void display7segLED(unsigned int num)
41. {
42. unsigned int digital;
43. for (unsigned char i = 0; i < com_num; ++i)
44. {
45. digital = num % 10;
46. ​​num /= 10;
47.
48. PORTD = segTable[digital];
49. digitalWrite(pinPos[i], COM_ON);
50.
51. delayMicroseconds(10);
52. digitalWrite(pinPos[i], COM_OFF); // Legendary blanking to avoid ghosting
53. }
54. }
55.
56. void loop()
57. {
58. static unsigned long lastTick = millis();
59. static unsigned int num = initNum;
60.
61. display7segLED(num);
62.
63. // Dynamic scanning, you can't use delay blocking delay. The usage tried before now comes in handy.
64. if (millis() - lastTick < delayMs)
65.
66.
67. lastTick = millis();
68. ++num;
69. if (num >= maxNum)
70. num = initNum;
71. }

Have you learned it? Haven’t seen it yet? !
The utility model discloses an Electronic Cigarette with atomizer oil core separation structure, which comprises a atomizer assembly and a battery assembly; The utility model has the advantages of reasonable structure design and high practicability. During operation, because the oil storage tank of the atomizer is completely sealed and the oil guide material is completely isolated from the oil guide material, the oil guide material will never contact with the oil guide material in the storage process
Advantages:
Oil core separation, Mesh removable heating core, Ultra quiet design,100% oil leakage free, Excellent taste, Cost far less than the industry price.
A variety of colors and finishing are available, can be adjusted according to your market needs.
Oil Coil Separation Pod Patent,Oil Coil Separetion Vape Pod Oem,Innovated Vape Products Oem,Oil Coil Separation Vape Products Oem
Shenzhen MASON VAP Technology Co., Ltd. , https://www.disposablevapepenfactory.com