This article describes the generation and considerations of the three ways to start the file on zynq, including the use of on-chip RAM (OCM) and DDR3.
JTAG mode
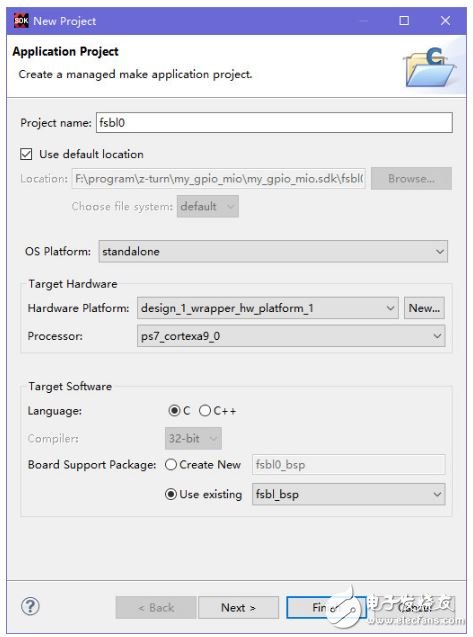
The JTAG method is the most common way to debug. In the SDK, right click on the "Project Explorer" window project -> Debug As-> Debug ConfiguraTIons to see the following window
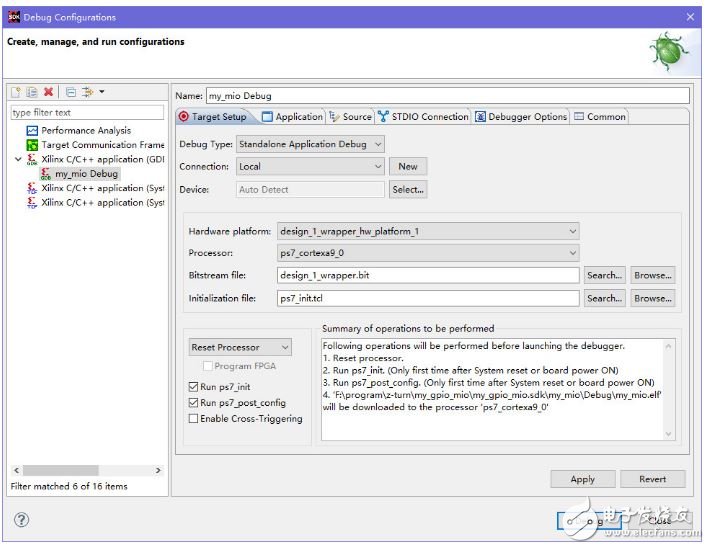
For the first time, open the left window and there is no sub-item under Xilinx C/C++ applicaTIon(GDB). Then double-click Xilinx C/C++ applicaTIon(GDB) to create a new debug.
At this time, the right window will automatically fill in the above picture, if not, manually fill in;
In the ApplicaTIon window on the right, specify the .elf file to be downloaded and debugged;
On the right side STDIO Connection can specify the standard input and output serial port, that is, printf print serial port, if you select the uart com port on the development board, the printf information will be printed to the console window during debugging, and the data can be input from the Console window. This will send the data to the development board through the serial port. After the above settings are completed, click Debug to start debugging.
If the above is right in the "Project Explorer" window project -> Run As-> Run Configurations; the configuration is similar to this, and finally click run to start running, but not debug but run directly on the board.
Use only OCM
Using OCM only means not using DDR3, which is slightly different from the way of using DDR3. Here, FSBL is not used to load the .bit file of the PL part and the second stage startup program (bare metal program), but directly load the bare machine program to OCM with BootROM, that is, the bare machine program is run as FSBL, of course, the following processing is required:
Include header file: #include "ps7_init.h"
Called at the beginning of the bare metal program main function: ps7_init()
Copy the ps7_init.c and ps7_init.h files from the design_1_wrapper_hw_platform_1 directory to the src directory where the bare metal program is located.
Note: The call to ps7_init() is only applicable to the case of using only OCM. After the test is started, DDR3 will be initialized in ps7_init(), and the debug will fail when the PLL is initialized (the cause is unknown).
Why do you want to call ps7_init()? From the above picture debugging, you can see the initialization file (Initialization files) ps7_init.tcl, which has the same effect as ps7_init(). At the same time, you can see the "Summary of operations to be performed" in the lower right corner of the debug configuration window. Also, call ps7_init, etc., and then load the elf to be debugged; since it is not run through JTAG, it does not run here ps7_init.tcl, so call ps7_init() directly at the beginning of the bare metal program.
The FSBL is not used here, and the .bit file cannot be loaded (the zynq startup process is also introduced), so it is only applicable to the case where the PL (including PL logic or PL IO, etc.) is not used; since the OCM size is 256 KB, it can only be used in the BootROM stage. Access to 192KB, so "only use OCM" requires bare metal programs less than 192KB.
Boot from SD
To boot from the SD card, you need the BOOT.bin file (adding the header information file recognized by BootROM), generated as follows:
Right click on the "Project Explorer" window project -> Create Boot Image or Xilinx Tools -> Create zynq Boot Image; you can get the following interface
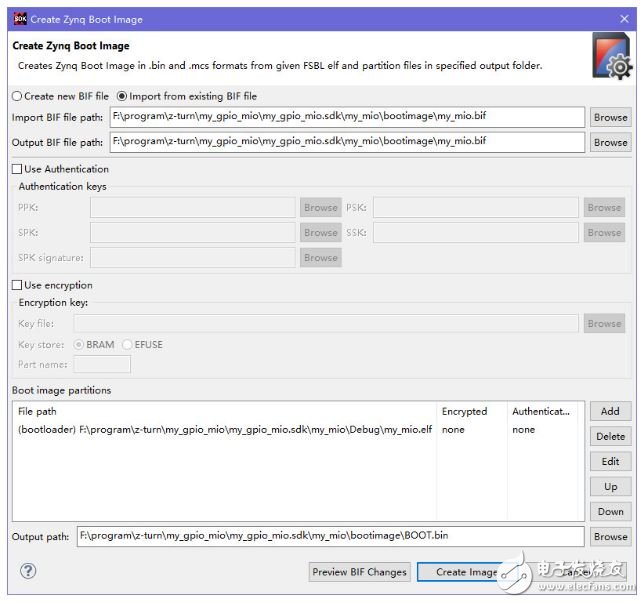
Usually the window is filled after the window is opened, otherwise it needs
1, select Create new BIF file
2, then select the BIF file directory
3, in the Boot image partitions Add bare metal program .elf file, you must select Partition type as bootloader
Make sure the output file is BOOT.bin and click Create Image to generate
At this point, just copy BOOT.bin to the SD card, set the board to start for the SD card, and power it back on.
Boot from QSPI
With the above SD boot operation, it is relatively simple from QSPI. To view some of the information, the .mcs file is required to write to QSPI. The BOOT.bin is generated in Create Boot Image and the .mcs file is also generated, but I use it. In the SDK version (2015.3), when the BOOT.bin file is generated, no .mcs file is found. After checking the data, the .mcs file can be generated by the bootgen command. Finally, the above part of the Create Boot Image window is described, as long as the output file BOOT. The suffix of bin is changed to .mcs to generate the .mcs format file. With the .mcs file you can download it, Xilinx Tools -> Program Flash gets the following window
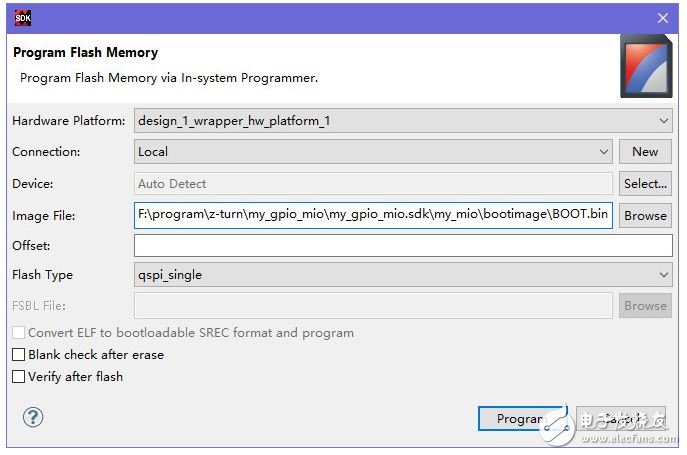
Select the .mcs file and click Program. Careful friends can find that the .bin file can also be selected when selecting the .mcs file. After testing, the .bin file can be downloaded directly to the flash and can be successfully started. This may be the reason why the .mcs file is not generated in the new SDK at the same time.
Then set the board to start QSPI and power it back on.
Using DDR
Using the DDR method, you need to use the FSBL to load the bare metal program, and of course support the configuration of the PL part.bit file. Therefore, in addition to the bare-metal program engineering, it is necessary to establish the FSBL program project. The project can directly use the SDK with the FSBL template, as shown below.
Note that you choose to use the same BSP as the bare metal program; click next
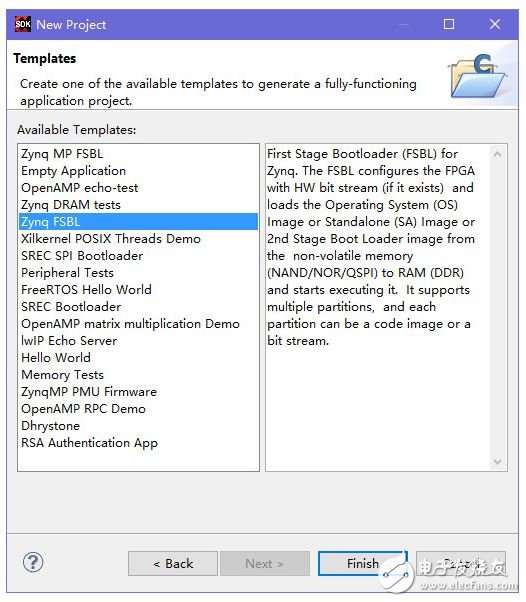
Select Zynq FSBL here, then click finish to generate the FSBL project.
Note: If the prompt cannot be created, the corresponding library (xilffs and xilrsa) is usually not opened in the BSP, as shown below.
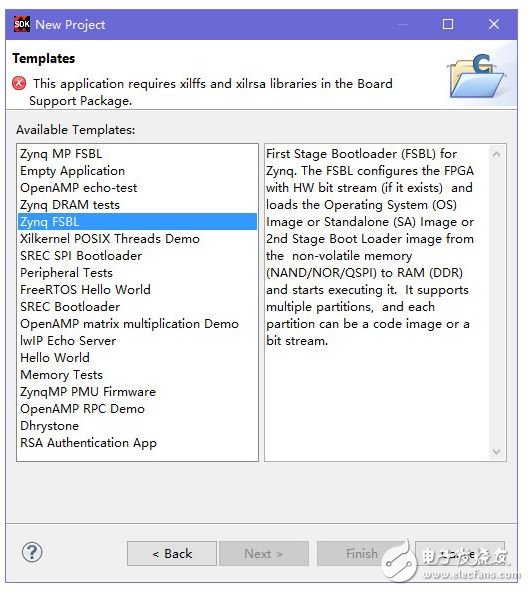
Open the two libraries by right-clicking on the "Project Explorer" window BSP -> Board Support Package Setting

Boot from SD
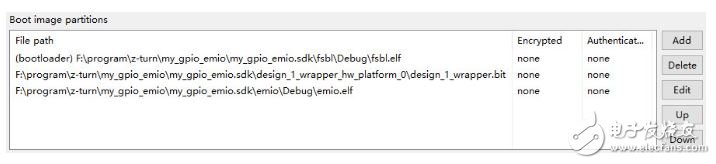
Similarly, booting from the SD card also requires the BOOT.bin file. The generation method is similar to the previous one, except that the Create zynq Boot Image window requires Add:
Select FSBL as the bootloader
Select PL part.bit file Select bare metal program.elf
The above order needs attention, as shown below
Same as above, at this time, just copy the BOOT.bin to the SD card, the board is set to start with the SD card, and the board can be powered on again.
Boot from QSPI
Similar to the case of using only OCM, download the .bin and then set the board to start for QSPI and power it back on.
Here you need to pay special attention to the use of SD card and QSPI when using "DDR". You need to open the SD module and QSPI module on zynq in vivado, unlike "OCM only", you can start without opening these modules; analyze and view the FSBL program. It can be seen that XPAR_PS7_DDR_0_S_AXI_BASEADDR must be defined to boot from SD or QSPI, so the DDR module must also be turned on here.
Note that the processing steps are recommended when debugging or downloading errors until the problem is solved.
. Replug the downloader
Power on the board after power off
. Close the SDK to reopen (and preferably only open one SDK)
Check the debug options, set it up
Check the zynq settings (such as when using DDR, if you choose DDR model is wrong, you can't debug)
If the startup is not normal, you can try to debug the FSBL:
To view the FSBL print debug information, define the macro FSBL_DEBUG_INFO(#define FSBL_DEBUG_INFO) in fsbl_debug.h, of course, also set STDIO to the corresponding UART (default baud rate 115200) in the debug settings or use other UART to view the print. information
When debugging the FSBL, note that it will take effect after changing the board startup mode after power-on or POR reset.
48V15Ah Lithium Ion Battery,48V15Ah Lithium Battery Pack,Li-Ion 48V15Ah Lithium Battery Pack,Echargeable Lithium Battery Pack 48V
Jiangsu Zhitai New Energy Technology Co.,Ltd , https://www.zt-tek.com